Fine Detail Brass Model Kits


Categories Painting Guide
Painting Guide

Painting a Severn Models Kit
Many modellers ask me about this, as if you haven't tried painting a model before it may seem somewhat daunting, but hopefully here I can help with some straightforward techniques to aid getting good looking results. I am by no means an expert painter, but I am getting better with practice. I try to use the surface texture of the etched brass to help me, by using a few methods I have learned along the way, so here is an outline of how I go about painting my models.
Firstly I assess the model to be painted, and decide how much of it will be assembled prior to painting, and how much will be easier to paint before assembly. Most simpler shaped buildings I often build the whole model and paint it in its complete state, however for things like signal boxes, I tend to assemble the stairs but not attach them to the building until after painting.
Once I have assembled the model, the first job is to wash it, to clean the surfaces to help the paint stick. I usually wash them in a bowl with a bit of water and some 'Cif' kitchen cleaner, gently scrubbing with an old toothbrush. Try to avoid washing-up liquid as some contain lanolin which interferes with adhesion of paint. Once washed, I leave the model near a radiator for a few hours until thoroughly dry.

I use paints from Games Workshop – this is a fantasy wargaming hobby specialist. They have shops in most major towns and they stock a wide range of acrylic based Citadel paint colours in pots for brush painting, and also some paints in aerosol form. Their staff are very knowledgeable model painters if you ever want to get some tips while buying some paint.
Brass models always require a primer paint, and I apply this from an aerosol can. At the moment I am using Halfords grey primer - it is a bit thicker so I try to apply a fast thin coat. As with all aerosol paints, ensure good ventilation when spraying and wear a suitable respirator mask. I apply a couple of very thin coats – little more than a dusting each time. All I want to do is prime the model without filling in any detail. Each coat dries fairly quickly being so thin, so it is usually only 10 minutes or so drying time between coats.
If the model is going to be handled a lot, then an 'etching primer' is required instead – this is an acidic paint that chemically bites into the metal. As my buildings and detailing are rarely handled, personally I find the etch primer isn't really necessary. Some etching primers are a bit thick, so try to spray lightly with quicker passes to avoid excess paint build up.

I will use a white primer if I can get it, as I find that it shows all the colours I apply after to be bright and clean. If I can not get white, then I use grey. I never use black primer as it is more difficult to cover black with a colour. If a building is to have white window frames, I often leave them as just white primer. It is easier to paint wall colour around windows than it is to paint white inside a brick wall aperture. Once all the surfaces are coated with primer, I set it aside usually overnight to dry thoroughly. The longer you can leave the primer to dry, the better it will be - so if you are in no hurry, leave it a couple of days.
The pots of Citadel colours for brush application are acrylic based paints. Acrylic paint is a sort of water based liquid plastic – while wet it can be diluted with water, but once dry it does not wash off. It is low odour, rinsing brushes and thinning it requires no solvents or chemicals – just water. Citadel colours are named to suit the fantasy miniatures at Games Workshop, so expect some creative sounding colours! Always shake the paint pots before use to give them a good mix, and wash brushes thoroughly straight after each painting session.
The most important thing that will help get good painting results, is to use good brushes. Many cheap 'hobby' brushes are not up to the job – they are badly shaped, poor bristles and will 'splay' and lose their shape quickly. Most of mine are handmade brushes from Rosemary's Brushes 'ivory' range. I also have some hog bristle ones that I use for rough jobs like large areas of bricks or other rough surfaces. Handmade may sound expensive, but they are still only a few pounds each, and they are a joy to use. One must acknowledge that small brushes are consumables, and that you will wear them out. However once a brush is starting to lose shape you can still use it for the rougher jobs like drybrushing, or painting on very rough surfaces which is hard work for a brush. I do have a few brushes that are very small, but I rarely use them. A good brush will end in a fine point, and the smallest detail can be picked out with just the point of a larger brush. For detail, brushes that don't have a pointed tip are best avoided, unless they are for drybrushing (more on this later). Don't ever leave brushes standing in a jar of water, or jab them vertically on the bottom – this ruins their shape faster than anything. To clean a brush, squeeze out any excess paint with kitchen towel, then 'swish' the brush in a jar of water, as if you were trying to gently paint the bottom of the jar.
When painting with acrylics, I rinse the brush regularly and change the water often. I try to keep the root of the brush damp (where the bristles meet the ferrule) as this helps reduce paint build-up over time. Paint will build up a little bit, this can't really be avoided, but good cleaning will make your brushes last longer than they would otherwise.
So with the model prepared, paint and brushes at the ready, time to start painting. I start with base colours on most areas, painting them bright and clean as if it was a new building. I generally paint things lighter than I want them to finish, and then add age and weathering with ink washes and drybrushing.
Windows & Doors
It can be simplest to paint these first if you are going to, as if you accidentally get a bit of colour on the walls you can go over it with brick colour after. I have a few shades of green and blue that I like for doors and windows, but this part is really whatever colour you like.

Bricks
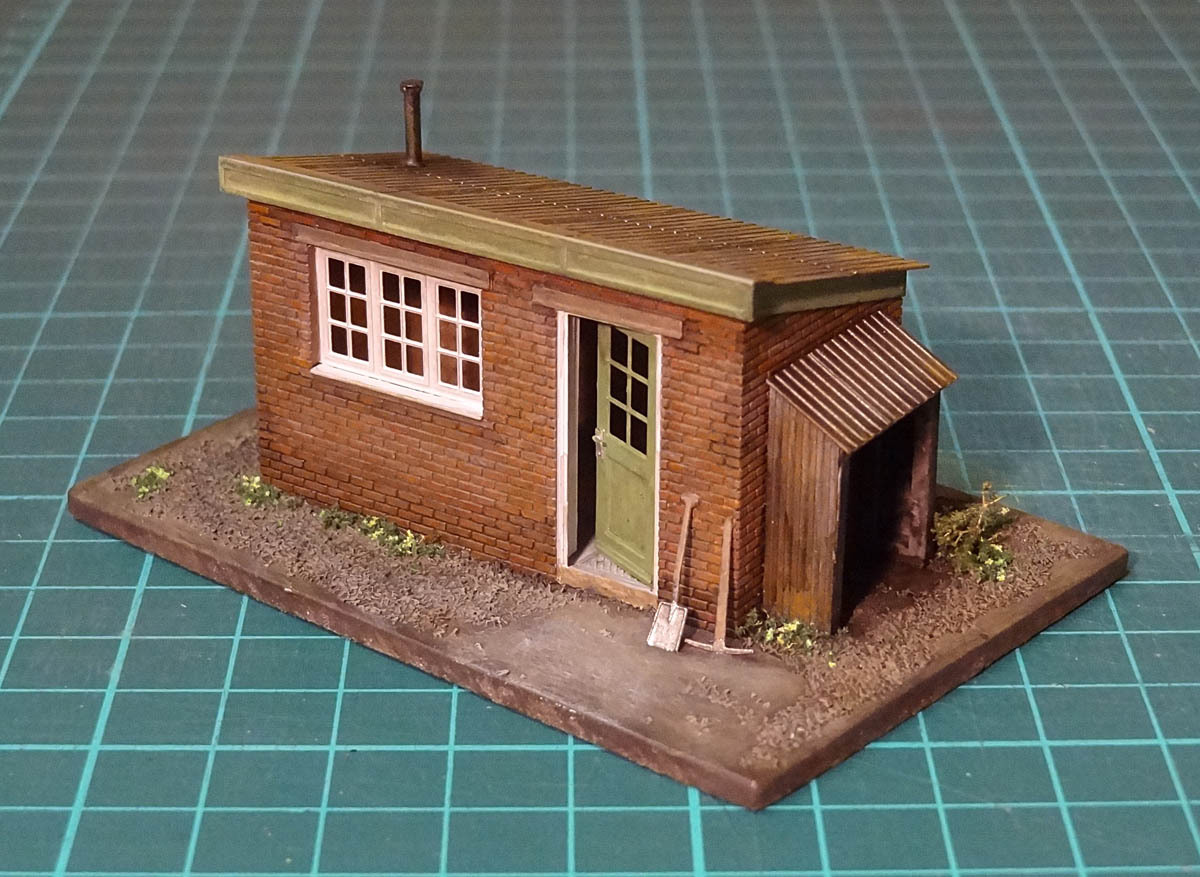
I usually pick one of my tan/terracotta brown shades of paint, and apply that to the whole wall including into the mortar lines. I can then use the other shades of brown to pick out odd bricks here and there randomly, or to paint foundation courses or arches over windows. I paint these colours just on the face of the bricks not into the mortar lines. Look at some real brick walls – it is amazing just how many shades of colour are in one wall.
The D1 brick hut in the photo uses the following :
Base colour – Skrag Brown
Odd random bricks – Gorthor Brown & Deathclaw Brown

Tiles and Slates
Again I choose one shade that is close to the colour of the roofing material I am trying to represent, and paint the whole roof with it. I tend to leave it there, and let the later ink wash and drybrush to finish the job.
Tiles base colour – I have previously mixed a custom tile colour with Gorthor Brown plus drops of red, but I may try some more citadel colours to find one I can use without mixing.
Slates base colour – Eshin Grey (lighter) or Mechanicus Grey (darker)
Corrugated Sheeting
I have a grey metallic that I paint onto corrugated metal first – as if it were new galvanised sheet. The one I have is quite an old paint pot called Gunmetal, but I think the new version is called Ironbreaker.

Timber
Wooden things can be a wide range of shades, from dark brown creosote right through to light grey where it has been bleached out in the weather for years.
Browns : Dryad Bark, Steel Legion Drab, Baneblade Brown, Gorthor Brown
Greys :Eshin Grey, Mechanicus Standard Grey, Dawnstone, Administratum Grey

Tools, Plant Pots & Detailing
I usually paint tools and detailing first, then glue them onto models afterwards with dots of epoxy.
To primer small items, I lay them on the furry side of a piece of hardboard and spray the primer on. The texture of the hardboard helps stop the small pieces blowing away from the aerosol primer spray. It is also a good idea to set up a small box behind the spraying area - then if the pieces do get blown away by the aerosol, they end up in the box so are easier to find!
For brush colours I have a bright metallic silver which I use on shovels etc as the base colour, but any bright silver will do. Handles are usually one of the shades of lighter brown.
Bright silver : Runefang Steel
Browns : Baneblade Brown, Steel Legion Drab
Other Colours
The Citadel range has dozens of colours, I have just listed a few to get started. Some of their paints are for special purposes or effects so I am going to give them a try – there are even a few that do cracked earth and other texture effects which I'm sure will prove useful.
Ink Shade Washes
Once the whole model is painted with its base colours, I then work on weathering it a little for extra realism. With the detailing of the brass kit being etched into the metal, it is ideal for using with simple ink washes to add areas of shadow, or vary colours. The ink clings in the etched lines allowing for subtle variations of colour without actually having to paint such small details. I mainly use a brown ink, diluted about 1 drop ink to 5 drops water – so it is not much more than muddy water. I wash the ink onto the model with a brush so that it flows into all the brick mortar lines where it clings into the texture, then randomly dab off a few spots with a piece of absorbent kitchen towel, and leave it to dry. I do extra washes in places where I want darker shades, such as near the ground. Doing this repeatedly can create a very natural looking building, a little bit grubby which buildings so often are.
If it looks too dark, you can lift ink back off with a brush while wet, or absorb it into kitchen towel.
This principle can also be used with very dilute paint instead of ink, which can give you a lighter mortar line in the bricks if that is your preference.
The Citadel 'Shade' range of paints are for this purpose, being very thin paints/inks. The most useful for buildings would be Nuln Oil and Agrax Earthshade. I am yet to try these myself – they may not need to be diluted as they are newer formulations than the shade ink I have in my paint box.


Drybrushing
This is a technique for adding highlights or weathering. I load a brush with paint but then wipe most of it back off the bristles onto a piece of paper until there is hardly any paint left on the brush. I then flick the brush over selected parts of the model and it leaves tiny specks of paint on raised areas, corners and texture, giving highlight effects or adding 'grime' to surfaces. If you use a normal brush for this, it will not last long before going out of shape. Citadel make special Drybrushes for doing this – they have stiffer bristles and are a different shape rather than pointed, though I believe they might not be as good as they were when I got mine. I am also currently using an old Rosemary's hog bristle HC30 size 1 as a drybrush which I have cut down to shorter bristles. I also have a hog bristle 142 series from Rosemary's - size small but it is quite a big brush so it gets mainly used for drybrushing larger surfaces or dirt effects when painting soil or concrete etc.
I often drybrush a few shades of brown onto bricks to suggest dirt, and a shade of grey for highlighting corners. I very rarely drybrush with white, as the highlight often looks too bright.
Drybrushing a few shades of reddish brown onto metallic surfaces can add good looking rust, and drybrushed black is good for soot around chimneys.
It is well worth practicing some drybrushing on another surface if you haven't tried it before – it is a very subtle technique so it is worth experimenting before drybrushing on your actual model.

Backup Plan
In the event that it has all gone wrong and you really don't like the result, all is not lost. I'm not sure if this works with all acrylics, but it works with Citadel paints on brass : soak the model in neat Dettol for a few hours and scrub it with an old toothbrush (don't add water to it). Much of the paint will come away right down to the metal. When it is all clean, rinse thoroughly in water then go back to the start with the Cif wash, and try again!
Addendum
The new S2 Dolls House kit and the N19 furniture kit prompted me to photograph the parts before assembly. It shows how I only assembled a few parts, then painted all of it as this would be very difficult after assembly. The painted pieces were then fixed together with superglue and epoxy resin.
